Learning to Program in .NET – What You Need to Get Started
27. August 2025

The .NET technology is a free development platform created by Microsoft in 2002, beginning with version 1.0 of the .NET Framework, initially designed solely for Windows desktop applications.
Since then, this programming language has evolved constantly, with various cross-platform and open-source projects. It now offers a wide range of frameworks that support diverse environments such as mobile, web, desktop, and IoT, making it one of the world’s most popular and versatile technologies.
Key components of .NET
There are several components created for .NET; however, the two main ones are the Common Language Runtime (CLR) and the .NET Framework class library. The CLR is an execution engine that manages running applications. The class library provides a set of APIs and types for common functionalities. Microsoft offers three languages on this platform: .NET – C#, F#, and Visual Basic.
Setting up the development environment
Microsoft provides two IDEs for development: Microsoft Visual Studio 2022 and Visual Studio Code, both of which support AI with GitHub Copilot.
How to install and configure Visual Studio Code
The installation process is straightforward, but may vary depending on selected packages or supported languages. The standard installation can be done in six steps, with an additional step if you need to add another language.
1 - Computer requirements check
It’s essential to verify if your computer meets all requirements, including memory, processor, disk space, operating system, and updates to ensure there are no issues during installation.
2 - Choosing the version to install
At this stage, select the most suitable version of Visual Studio, paying particular attention to licensing. You can choose the open-source version of Visual Studio Code, which is cross-platform and maintained by Microsoft itself. It can be downloaded here or here.
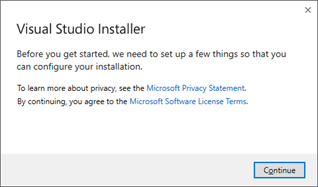
3 - Starting the installation
After downloading, run the installer. The message should look like this:
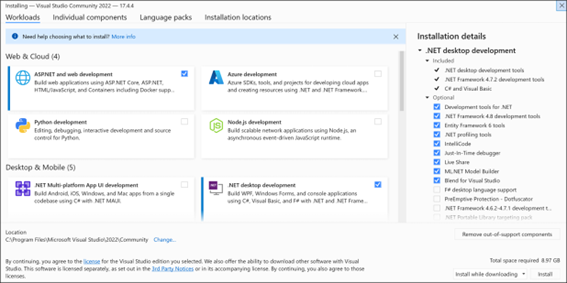
4 - Choosing work options
This step presents various options to support languages and frameworks. You can select workloads with projects for mobile devices, C#, C++ web, and more.
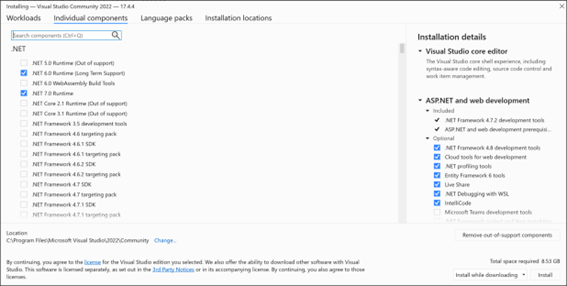
5 - Selecting Individual components (optional)
Individual components can be selected for greater convenience. Although optional, this step is important if you plan to work with specific frameworks.
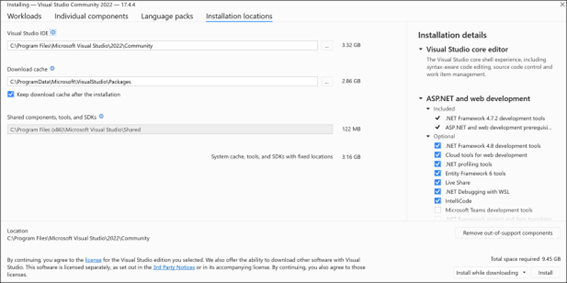
6 - Choosing the installation location (optional)
If needed, you can choose a different directory or volume.
Essential programming concepts in .NET
Why use C#?
- - It is one of the most popular programming languages, currently ranking 5th on the TIOBE index;
- - It’s easy to learn and has a large community and high-quality documentation, making the learning journey more accessible.
- - C# is an object-oriented language, providing a clear and readable structure.
- - It’s similar to other languages like C, C++, and Java, making transitions easier.
Object-oriented programming in C#
Declaring a variable
To create a variable, specify the type and assign a value.
Example: type variableName = value;
Types of Operators
Arithmetic Operators
Arithmetic operators are used to perform operations on variables and values.
Operator | Name | Description | Example |
|---|---|---|---|
+ | Addition | Adds together two values | x + y |
- | Subtraction | Subtracts one value from another | x - y |
* | Multiplication | Multiplies two values | x * y |
/ | Division | Divides one value by another | x / y |
% | Modulus | Returns the division remainder | x % y |
++ | Increment | Increases the value of a variable by 1 | x++ |
-- | Decrement | Decreases the value of a variable by 1 | x-- |
Assignment Operators
Assignment operators are used to assign values to variables.
Operator | Example | Equivalent to |
|---|---|---|
= | x = 5 | x = 5 |
+= | x += 3 | x = x + 3 |
-= | x -= 3 | x = x - 3 |
*= | x *= 3 | x = x * 3 |
/= | x /= 3 | x = x / 3 |
%= | x %= 3 | x = x % 3 |
&= | x &= 3 | x = x & 3 |
|= | x |= 3 | x = x | 3 |
^= | x ^= 3 | x = x ^ 3 |
>>= | x >>= 3 | x = x >> 3 |
<<= | x <<= 3 | x = x << 3 |
Comparison operators
Comparison operators are used to compare two values (or variables), an essential tool for making decisions in programming.
Operator | Name | Example |
|---|---|---|
== | Equal to | x == y |
!= | Not equal | x != y |
> | Greater than | x > y |
< | Less than | x < y |
>= | Greater than or equal to | x >= y |
<= | Less than or equal to | x <= y |
Logical operators
Like comparison operators, logical operators allow testing of true or false values.
Operator | Name | Description | Example |
|---|---|---|---|
&& | Logical and | Returns true if both are true | x < 5 && x < 10 |
|| | Logical or | Returns true if one is true | x < 5 || x < 4 |
! | Logical not | Reverse of result, returns false if result is true | !(x < 5 && x < 10) |
Conditional Structures: If/Else
C# supports the logical conditions used in mathematics:
- - Less than: a
- - Less than or equal to: a
- - Greater than: a > b
- - Greater than or equal to: a >= b
- - Equal to: a == b
- - Not equal to: a != b
Example::
int time = 20;

if (time < 18)
{ Console.WriteLine("Good morning."); }
else
{ Console.WriteLine("Good evening."); }
Switch/Case Structure
The switch structure is used to select one of several blocks of code.
Example::
switch(expression)
{
case x:
// code block
break;
case y:
// code block
break;
default:
// code block
break;
}
Repetition loops: while/for/foreach
The while loop runs a block of code as long as a specified condition is true.
Example::
int i = 0;

while (i < 5)
{
Console.WriteLine(i);
i++;
}
Knowing exactly how many times a code block should be executed, it’s more convenient to use a loop for instead of a loop while.
Example::
for (int i = 0; i < 5; i++)
{
Console.WriteLine(i);
}
There is also a foreach loop, used exclusively for iterating over elements in an array (or other collections of data).
Example::
string[] cars = {"Volvo", "BMW", "Ford", "Mazda"};

foreach (string i in cars)
{
Console.WriteLine(i);
}
Arrays
Arrays are used to store multiple values in a single variable, instead of declaring separate variables for each value. To declare an array, specify the type of variable within brackets.
Example::
string[] cars;
Add elements:
String[] cars = {"volvo", "opel", "fiat"};
Access an element by position:
Console.WriteLine(carros[0]); // Accesses the first element in the "cars" array
Classes
In C#, everything relates to classes and objects, which have attributes and methods. For instance, in reality, a car is an object with attributes like weight and color, as well as methods, such as accelerating and braking. A class serves as a blueprint for creating objects.
Example:
class Car
{
string color = "green";
}
Strings
Strings are used to store text. A string variable contains a collection of characters within quotation marks.
Variable string = "this is text";
Web development with .NET
Introduction to ASP.NET core
ASP.NET Core is a framework for web application development, based on the MVC (Model-View-Controller) pattern. It’s an open-source framework that allows execution on multiple platforms, including Windows, Linux, and Mac. ASP.NET Core extends the .NET platform with specific tools and libraries for building web applications.
How to create your first web application
- - Start Visual Studio and select Create a new project.
- - In the dialog box, choose Create a new project and then ASP.NET Core Web Application (Model-View-Controller). Next, click Next.
- - In the dialog box Configure your new project:
- - Enter My Project in the Project Namefield. For the name, ensure the use of uppercase and lowercase matches the namespace when copying code.
- - Project Location can be set as desired.
- - Click Next.
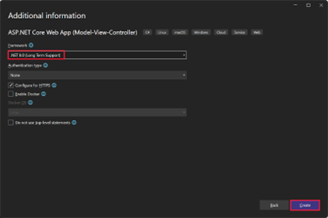
- - In the Additional Information dialog box:
- - Select .NET Core 8.0 (Long-Term Support).
- - Ensure that the option Don’t use top-level statements is unchecked.
- - Click Create:
- - Next steps:
- Press CTRL+F5 to run the application without the debugger.
- Visual Studio will display a dialog box if the project is not configured to use SSL:

- If prompted, select Yes to trust the IIS Express SSL certificate. The following dialog box will appear:
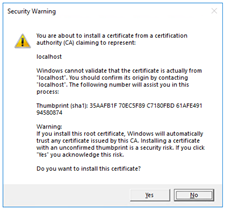
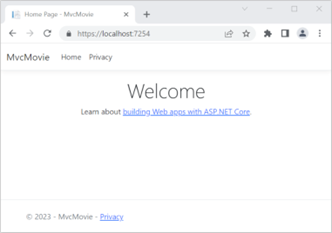
Select Yes if the development certificate is trusted. The following image shows the application:
Working with databases in .NET
Introduction to Entity Framework Core
Entity Framework Core (EF) is a lightweight, extensible, open-source, cross-platform version of the popular Entity Framework data access technology. EF Core can act as an O/RM (Object-Relational Mapper) that:
- - Allows .NET developers to work with a database using .NET objects.
- - Eliminates much of the data access code that typically needs to be written.
With EF Core, data access is performed using a model comprising entity classes and a context object, which represents a session with the database. The context object enables querying and saving data.
EF supports the following model development approaches:
- - Manage a model from an existing database.
- - Code a model to match the database.
- - Use EF migrations to create a database from the model. Migrations allow evolving the database as the model changes.
Setting up a database
Installing Entity Framework Core
To install EF Core, you need to select the EF Core database provider package you want to target. For example, you can use SQLite, which runs on all platforms supported by .NET.
Run the command in Visual Studio:
- Tools > NuGet Package Manager > Package Manager Console
Install-Package Microsoft.EntityFrameworkCore.Sqlite
- Code example demonstrating how a data access context works:
using System.Collections.Generic;
using Microsoft.EntityFrameworkCore;
namespace Intro;

public class BloggingContext : DbContext
{
public DbSet<Blog> Blogs { get; set; }
public DbSet<Post> Posts { get; set; }
protected override void OnConfiguring(DbContextOptionsBuilder optionsBuilder)
{
optionsBuilder.UseSqlServer(@"Server=(localdb)\mssqllocaldb;Database=Blogging;Trusted_Connection=True;ConnectRetryCount=0");
}
}

public class Blog
{
public int BlogId { get; set; }
public string Url { get; set; }
public int Rating { get; set; }
public List<Post> Posts { get; set; }
}

public class Post
{
public int PostId { get; set; }
public string Title { get; set; }
public string Content { get; set; }
public int BlogId { get; set; }
public Blog Blog { get; set; }
}
Creating a Database
In the package manager, execute the following commands:
- - Install-Package Microsoft.EntityFrameworkCore.Tools // Tools to add migrations
- - Add-migration InitialCreate // Command to add the initial migration.
- - Update-Database // Command to create the database.
Basic CRUD operations in SQL:
using System;
using System.Linq;
using var db = new BloggingContext();

// Note: This example requires the database to be created before execution.
Console.WriteLine($"Database path: {db.DbPath}.");

// Criar
Console.WriteLine("Inserting a new blog");
db.Add(new Blog { Url = "http://blogs.msdn.com/adonet" });
db.SaveChanges();

// Ler
Console.WriteLine("Querying for a blog");
var blog = db.Blogs
.OrderBy(b => b.BlogId)
.First();

// Update
Console.WriteLine("Updating blog and adding a post");
blog.Url = "https://devblogs.microsoft.com/dotnet";
blog.Posts.Add(
new Post { Title = "Hello World", Content = "I wrote an app using EF Core!" }
);
db.SaveChanges();

// Delete
Console.WriteLine("Deleting the blog");
db.Remove(blog);
db.SaveChanges();
Testing code in .NET
Importance of Code Testing
Software testing is a fundamental part of development. It ensures code works as expected and helps identify and fix bugs.
Unit tests reinforce modular thinking paradigms, improving test coverage and quality. Furthermore, automating unit tests allows developers to focus more on programming and implementing new features.
Creating a project for testing
- - Open Visual Studio
- - In “File,” select “New Project”
- - Search for “test,” select either “MSTest” or “NUnit test project,” then click “Next”
- - Name the project and click “Next”
- - Select the Framework and click “Create”
Creating a test method
Below is an example of a bank account, where the first test verifies that a valid value (i.e. a value that is less than the account balance and greater than zero) withdraws the correct amount from the account.
Add the following method to the BankAccountTests class:
[TestMethod] // all test classes are decorated with this tag

public void Debit_WithValidAmount_UpdatesBalance()
{
// Arrange
double beginningBalance = 11.99;
double debitAmount = 4.55;
double expected = 7.44;
BankAccount account = new BankAccount("Mr. Bryan Walton", beginningBalance);

// Act
account.Debit(debitAmount);

// Assert
double actual = account.Balance;
Assert.AreEqual(expected, actual, 0.001, "Account not debited correctly");
}
The method defines a new BankAccount object with an initial balance and then withdraws a valid amount. It then uses the Assert.AreEqual method to verify that the final balance is as expected. Methods such as Assert.AreEqual, Assert.IsTrue, among others, are frequently used in unit testing.
The most commonly used tools for identifying and fixing errors in code are NUnit, MSTest, and xUnit, which all provide various resources for testing code to make it more robust and reliable.
Debugging an application
Keyboard shortcuts are a quick way to execute debugging commands, but equivalent commands, like those on the toolbar or menu, are also effective.
To start the debugger, select F5 or choose the Debugging Target button on the standard toolbar, or click Debugging > Start Debugging on the menu bar.

The F5 key starts the application with the debugger attached to the process. Since no breakpoints were set, the application runs to completion.
The following output appears in the Windows Command Prompt
Hello, f! Count to 1
Hello, fr! Count to 2
Hello, fre! Count to 3
Hello, fred! Count to 4
Hello, fred ! Count to 5
Hello, fred s! Count to 6
Hello, fred sm! Count to 7
Hello, fred smi! Count to 8
Hello, fred smit! Count to 9
Hello, fred smith! Count to 10
You can stop the debugger by selecting Shift+F5, pressing the Stop Debugging button on the toolbar, or choosing Debugging > Stop Debugging on the menu bar.
In the console window, select any key to close it. One of the most useful debugging tools is the ability to inspect variables, allowing you to check the program’s state at runtime.
Wilde Artikel
Artificial Intelligence in Cybersecurity: How it is transforming attacks and digital defence
Strong and secure passwords: a practical guide to strengthening your online security
How a functional analyst transforms requirements into solutions
The role of COBOL in banking infrastructure
RPG/AS400: How this technology keeps up with digital advancements
Essential skills for functional analysts
